


Anti Fade Window Film NUVF 60
Our anti fade window film NUVF 60 is a lightly tinted metalized film designed to reduce excess ultraviolet (UV), visible and infrared (IR) light, all of which are causes of fading to home furnishings, woodn floors, paintings and photographs. This fade protection window film reduces ultraviolet light by 99.5%. The film can be purchased by the metre in a length and width of your choice, or for ease of installation cut to size.
NOTE: No window film can completely prevent fading. For best results, choose a film that also targets visible light and infra red light. As a rule, the darker the film, the more efficient it is at mitigating fading.
Read MoreMeasurement Convertor
Product Description
- Reduces UV light by 99.5%
- Reduces visible light by 66%
- Reduces infra red light by 42%
- Safeguard furnishings, wooden floors, artwork and photographs
- Order by the metre
Our anti fading window film is the most efficient at reducing all 3 main causes of fading in furnishings.
All printed and coloured furnishings in our homes and offices, including photographs and paintings, as well as timber flooring and carpets, will eventually fade due to the sunlight, ambient air and pollution. By applying UV blocking window film on all glazed areas, you will greatly extend the lifespan of your precious items.
Our anti fade window film is the market leading product of its kind due to having a different composition to most. Typically, anti fade films are made using only one layer of polyester yet ours has two with UV treatment on both layers therefore providing double protection from harmful rays.
There are six factors affecting fabric fading:
-
Ultraviolet Light is the main cause of fading
-
Visible Light
-
Infrared light
-
Humidity
-
Chemical Vapours (including ozone)
-
Age of Fabric
-
Dye Fastness
There is no window film that can completely eliminate fading however it can offer maximum protection from fading caused by solar ultraviolet light and solar heat.
Our film is widely used by heritage bodies, museums, art galleries and private buyers. We’ve even had the pleasure of providing Buckingham Palace with our second-to-none anti fade film!
Back to top
Product Specification
| Performances | Anti Fade Window Film NUVF 60 |
|---|---|
| U V Transmission
|
0.5% |
| Visible light reflection
|
11% |
| Visible light transmission
|
66% |
| Total solar energy rejected (Heat)
|
42% |
| Solar reflection
|
18% |
| Solar absorption
|
26% |
| Solar transmission
|
56% |
| Glare reduction
|
28% |
| "g" value(Solar heat gain coef.)
|
0.59 |
| "u" value(EN673W/m2.k0)
|
5.8 |
| Scratch resistant coating
|
YES |
| Compatibility
|
|
| Clear Single Pane
|
YES |
| Tinted Single Pane
|
YES |
| Clear Double Pane (non toughened)
|
YES |
| Clear Double Pane (toughened glass)
|
YES |
| Clear Laminated single pane
|
YES |
| Clear Laminated Double Pane
|
YES |
| Tinted Double Pane (non toughened)
|
YES |
| Tinted Double Pane (toughened glass)
|
YES |
| Low-E Double Pane
|
YES |
| Polycarbonate roof
|
NO |
| Domed skylights
|
NO |
| Application | |
| Internal
|
YES |
| External
|
NO |
| Warranty | |
| Internal warranty(Years)
|
10 |
| External warranty(Years)
|
N/A |
| Against Peeling
|
YES |
| Against Cracking
|
YES |
| Against Demetallization
|
YES |
How To Apply
Step by step instructions on how to apply window film & frost glass
Regardless of the type of window film or stickers you purchase, whether frosted, tinted, mirror or decorative, the principle on how to fit window film will be the same. We also have several targeted video tutorials which you will find by clicking here.
Glass Preparation (the crucial task)
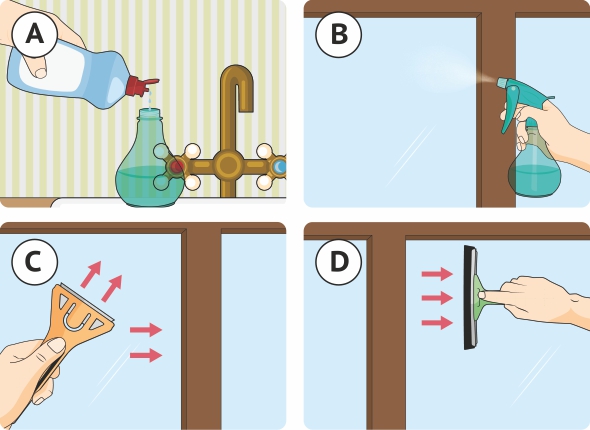
Make a slip solution using a few drops of washing up liquid mixed with water in a spray bottle and thoroughly clean the glass. Use a glass scraper to remove specks of paint, or any other glass covering like stickers.
Film Cutting
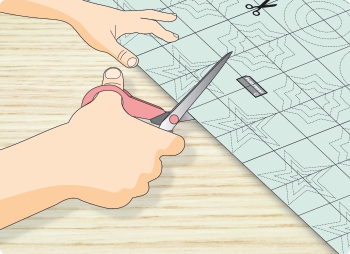
Unless your window film is already cut to size, and if the film has a paper liner with a metric grid, measure your glass at the top and bottom, and left and right and mark and cut your window film. You can also cut the film bigger than required and trim it once applied to the glass.
Film Application
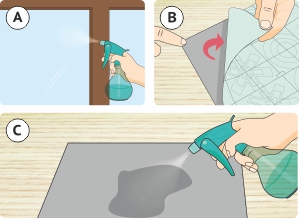
A. Thoroughly wet the glass with the slip solution.
B. Place the window film face down an a flat surface and expose a small amount of the adhesive or cling side.
C. Spray the adhesive or cling side liberally with the slip solution as you peel off the protective liner.
D. Slip the adhesive or cling side of the film on the glass butting one edge and the top against the window frame or rubber gasket (double glazed unit).
Squeegee Technique
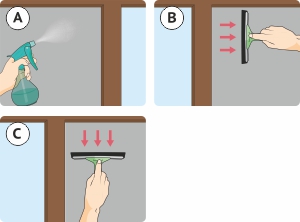
A. Liberally wet the face of the film with the solution to act as a lubricant fro your squeegee or felt edged tool.
B-C. Squeeze out the solution from under the film using a firm and even pressure, starting from the top and working your way down and across the film.
Film Trimming
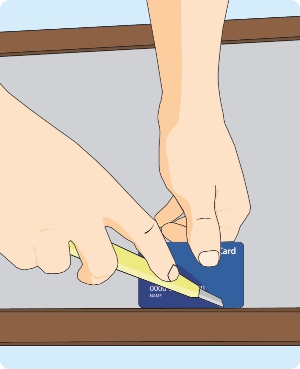
Run a credit card and a retractable knife blade down the edge of the glass to trim any excess film. The thickness of the card will allow for a small gap to help any remaining solution to be squeezed out. Once trimming is complete go over the film once more to squeeze out all the solution.
Final Checks
1. Make sure that all the solution has been squeezed out.
2. Wipe the film and any remaining solution with paper towel.
3. Inspect the film on both sides of the glass to check for any trapped solution or air bubbles.
How To Remove Window Film
Removing window film can be a very easy process, but it all depends on how long the film has been on the glass, and the type of film that was used.
Here's a video tutorial which shows the basic principal.
Typically, films are either made using PVC or PET.
PVC is a soft material which can be peeled off the glass with a glass scraper. Any glue residue can be removed with soapy water and a scraper.
PET is a brittle material widely used for solar and safety film, and might be made of layers of mettalised material. To remove this type of film, use a wide glass scraper and lubricate with soapy water to remove the film.
As a rule, old PET film are more difficult to remove than PVC films.
For large panes, it is best to first score the film into strips with a sharp knife. This means that you can tackle it in more manageable pieces.
Measuring Tips
Ready to place your window film order?
You will first need to measure the glass, in centimetres, using a tape measure. Only measure the glass you want to cover.
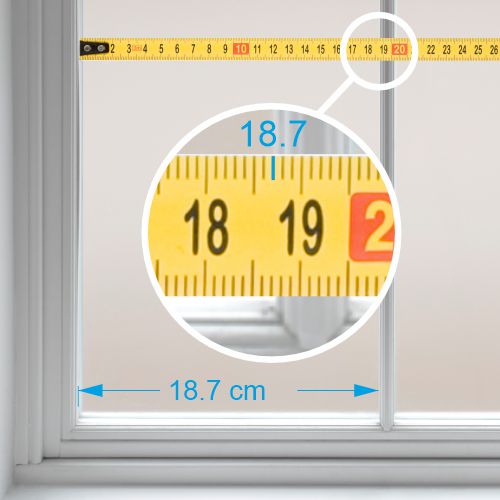
Width: measure from left to right at the top and the bottom of the glass, and take note of the largest measurements (some older wooden windows are not perfectly square).
Height: measure from top to bottom on the left and the right of the glass, and take note of the largest measurements.
Top tip
Leaving a clear gap around frosted or patterned film is a stylish and practical option, allowing you to peep out when someone is at the door for example. To create a clear outline around the film, deduct twice the width of the desired clear outline, to the width and the height of your pane.
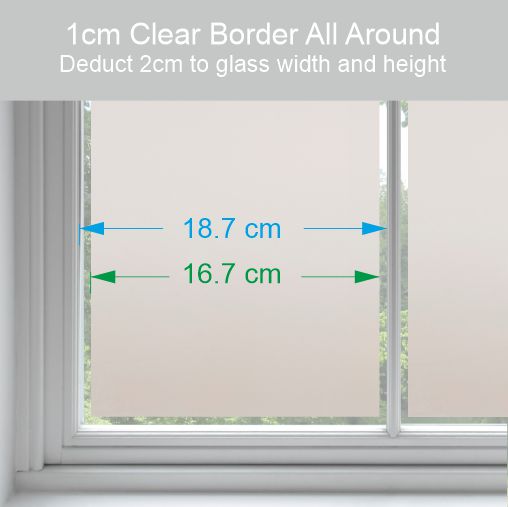
For example, if you want a 1cm (10mm) clear gap all the way round, deduct 2cm from the width, and the same from the height.
Fitting the film with a gap all the way round is much easier, especially on old wooden windows and doors which are not always in the best condition, and where the edge of the glass has paint encroachment.
Care
How To Care For Your window film After Installation
Window film is very easy to look after and you won't need any special products to clean it with. In fact, soapy water, similar to the solution you used to apply the film is the best cleaning product.
Do's
Wait for at least 3 weeks before first cleaning your film
Use soapy water
Use a soft cloth or paper towel
Use a rubber edged squeegee (unless the film is printed or has cut outs) in good condition
Don'ts
Do not use abrasive products
Do not use Amonia based products
Do not use defective or damaged squeegees
Caring for printed films, or films with cut-outs
Extra care must be taken when cleaning printed films, or films which have been cut out and have exposed edges. Gently clean with a soft cloth only, and take particular care around the cut areas. Do not rub too hard or use a squeegee as it could damage the print or your cut film.
Caring for static cling films & stickers
Take extra care around the edges and clean your sticker or film from the centre out. Do not use a squeegee.